
Last Updated: 2019-07-01
What is an API?
An application programming interface (API) is a set of subroutine definitions, communication protocols, and tools for building software. A good API makes it easier to develop a computer program by providing all the building blocks, which are then put together by the programmer.
An API may be for a web-based system, operating system, database system, computer hardware, or software library.
An API specification can take many forms, but often includes specifications for routines, data structures, object classes, variables, or remote calls. Documentation for the API usually is provided to facilitate usage and implementation.
Simplicity
Programmers tend to solve complex problems, making it easy to let that complexity bleed through to users of our APIs. Keeping them simple requires work, and sometimes presents a serious challenge. Fight the urge to add undue complexity, even when you think it might help. Good APIs offer simplicity, and it takes a good bit of effort to preserve that simplicity.
Abstraction
When you successfully hide details from users of your API, leaving only the essentials, you offer them abstraction. Well written code provides abstractions, and APIs are no exception. Your API should hide the details of what it does from your users while making itself useful to them. If your users need to dive into your code or execution to understand, you have provided a poor abstraction.
Consistent and Symmetrical
Consistency is relatively easy to understand. Don't call them "users" sometimes and "customers" at other times. Name the same things the same way. Have a common style. Make your API predictable.
Symmetry presents a slightly more subtle consideration. When I talk about symmetry, I mean a tendency to close open loops in a way that your users expect. For example, if you have an API for file access that lets you call Open(string filename), you should also offer a Close(string filename) method. Open and close have opposite meanings, so offering both creates symmetry as concerns that operation. Calling the Close method "Destroy" or, worse, not having a close method, would create a great deal of confusion.
What you'll build
In this codelab, you're going to build two JavaScript Apps.
- Meet the Noops!
- Consume the Noop API
- Process the response from Noop
- Display the output to user
- Build a Noop!
- Build a simple Noop-like API
- Process incoming requests
- Provide a response
What you'll learn
- How to consume an API?
- How to provide API parameters?
- How to process API response?
- How to build a basic node.js API server?
- How to process API parameters?
- How to provide API response?
This codelab is focused on APIs. Non-relevant concepts and code blocks are glossed over and are provided for you to simply copy and paste.
What you'll need
- WebStorm/Brackets/Sublime Text/VS Code/any other Web IDE/Text editor.
- POSTMan
- Web Browser (Chrome/Chromium preferred)
- Knowledge of HTML, CSS, JavaScript, and Chrome DevTools.
We've put everything you need for this project into a Git repo. To get started, you'll need to grab the code and open it in your favorite dev environment. It is not mandatory to download the code, but it will be helpful as a reference.
Download code from Git & work locally
To download the code and work locally, you'll need to have a recent version of Git, Node, and code editor setup and ready to go.
Download Source Code
Stage 1 - Basic Setup
Create a file named stage-1/index.html in your project and copy/paste the following contents:
stage-1/index.html
<html>
    <head>
        <title>Simple API App</title>
    </head>
    <body>
        <h2>Hello World!</h2>
        The WordBot sent us:
        <p id="result">
        </p>
    </body>
</html>
Here, we have created a simple static webpage that will display some text. You can go ahead and test this by opening the HTML file in a web browser.
Stage 1 - Add Functionality
Next, we need to add some functionality to our app, in order to make it useful.
To do this, we will take some help from the WordBot from the Noops Challenge.
WordBot provides us an API endpoint that we can access in our web app. The endpoint will return a random word as a response every time we send a request.
Add the following code to our stage-1/index.html file above head tag.
stage-1/index.html
<script type="application/javascript">
     // Set up our HTTP request
     let xhr = new XMLHttpRequest();

     // Setup our listener to process completed requests
     xhr.onload = function () {

           // Process our return data
           if (xhr.status >= 200 && xhr.status < 300) {
                // What do when the request is successful
                console.log('success!', xhr.response);
                let result = JSON.parse(xhr.response);
                document.getElementById("result").innerHTML = result.words[0];
           } else {
                // What do when the request fails
                console.log('The request failed!');
           }

           // Code that should run regardless of the request status
           console.log('This always runs...');
     };

     // Create and send a GET request
     // The first argument is the post type (GET, POST, PUT, DELETE, etc.)
     // The second argument is the endpoint URL
     xhr.open('GET', 'https://api.noopschallenge.com/wordbot');
     xhr.send();
</script>
Dive into the code
The above code allows us to perform following functionalities:
- Create an HTTP Request
- Send the HTTP Request
- Perform some logic on response of the HTTP Request
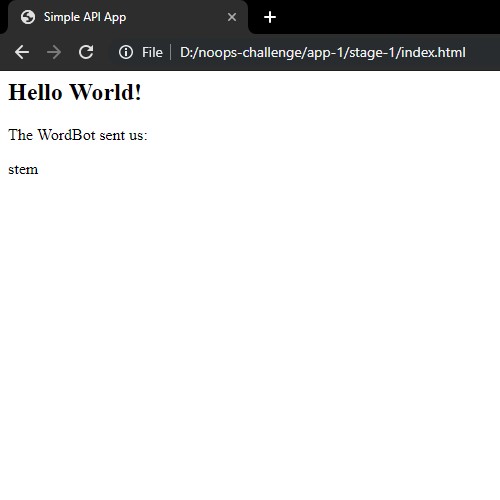
Observing the output
Go ahead and refresh the stage-1/index.html page open in your browser after you have added and saved the above code. You should be able to see an output similar to this:
Stage 2 - Basic Setup
Create a file named stage-2/index.html in your project and copy/paste the following contents:
stage-2/index.html
<html>
    <head>
        <title>Simple API App</title>
    </head>
    <body>
        <h2>Simple MadLibs</h2>
        <div style="display: flex;">
            <b>Enter your short story here:</b>
            <br>
            <br>
            <div style="width: content;margin-right: 5%;margin-left:5%;">
                <textarea rows="20" cols="50" id="source"></textarea>
                <br>
                <input type="button" value="Generate Story!" onclick="generateMadLib(document.getElementById('source').value)">
            </div>
            <div style="width: 50%;">
                <b>Sample Story:</b>
                <br>
                I am *dinosaurs*. I like to *verbs*.
                <br>
                <b>Possible tags:</b>
                <br>
                <span id="sets" style="width:50%;word-break:break-word;">
                </span>
            </div>
        </div>
        <br>
        <h3>The Result:</h3>
        <br>
        <div id="result">
            Story will appear here.
        </div>
     </body>
</html>
Here, we have created a simple static webpage that will display some text and input elements. You can go ahead and test this by opening the HTML file in a web browser.
Stage 2 - Add Functionality
Now, we will add some functionality to our web app, for the users to actually be able to generate madlibs.
Add the following code to our stage-2/index.html file above head tag.
stage-2/index.html
<script type="application/javascript">
    async function generateMadLib(text) {
        if(text) {
           let result = "";
           text = text.trim().split(".");
           console.log(text);
           for(i=0;i<text.length;i++) {
               entry = text[i];
               entry = entry.trim();
               let set = entry.match(/(?<=\*)(.*?)(?=\*)/g);
               if(set) {
                  console.log(set);
                  let res = await fetch('https://api.noopschallenge.com/wordbot?count=1&set='+set[0]).then(function(response) {
                           return response.json();
                       });
                  entry = entry.replace("*"+set[0]+"*",res.words[0]);
                  console.log(entry);
                  result = result+entry+". ";
               }
              }
            document.getElementById("result").innerHTML = result;
          }
      }

        window.onload = function() {
            let xhr = new XMLHttpRequest();

            // Setup our listener to process completed requests
            xhr.onload = function () {

                // Process our return data
                if (xhr.status >= 200 && xhr.status < 300) {
                    // What do when the request is successful
                    console.log('success!', xhr.response);
                    let result = JSON.parse(xhr.response);
                    document.getElementById("sets").innerHTML = xhr.response.toString().replace("[","").replace("]","");
                } else {
                    // What do when the request fails
                    console.log('The request failed!');
                }

                // Code that should run regardless of the request status
                console.log('This always runs...');
            };

            // Create and send a GET request
            // The first argument is the post type (GET, POST, PUT, DELETE, etc.)
            // The second argument is the endpoint URL
            xhr.open('GET', 'https://api.noopschallenge.com/wordbot/sets');
            xhr.send();
        }
    </script>
Dive into the code
Here, we have added the following functionalities to our app:
- Displaying a list of possible tags that can be used in madlibs input when page loads
- Accepting a story with tags written by the user in input box
- Displaying a madlib by replacing tags in user provided input by fetching random words from particular sets of words from WordBot using provided tags
Observing the output
Go ahead and refresh the stage-2/index.html page open in your browser after you have added and saved the above code. You should be able to see an output similar to this:

Congratulations, you've successfully built your first Web App using APIs!
You understood the basic API access concepts and you built a meaningful app using only APIs. You learned how to use DevTools to debug an app.
You now know the key steps required to use APIs in any web app.
What's next?
Now we will move on to build our second app in the workshop outside this codelab.